Tuesday, August 31, 2021

VMware install / repair error "Service 'VMware Alias Manager and Ticket Service' (VGAuthService) could not be installed"

Product: VMware Tools -- Error 1920. Service 'VMware Alias Manager and Ticket Service' (VGAuthService) failed to start. Verify that you have sufficient privileges to start system services.

Product: VMware Tools -- Error 1923. Service 'VMware Alias Manager and Ticket Service' (VGAuthService) could not be installed. Verify that you have sufficient privileges to install system services.


Windows event log also had below error

Log Name:      System
Source:        Application Popup
Date:          31/08/2021 7:52:58 PM
Event ID:      26
Task Category: None
Level:         Information
Keywords:      
User:          SYSTEM
Computer:      IPTPRDTHY101.internal.qr.com.au
Description:
Application popup: vmtoolsd.exe - System Error : The code execution cannot proceed because VCRUNTIME140.dll was not found. Reinstalling the program may fix this problem. 

So it was clearly an issue with VC++

So 

1) Uninstalled two instanced of 2015-2019 VC++ from add/remove programs

2) Installed VMware tool again 

There was no error this time. Thanks! 

Monday, August 2, 2021

PowerCLI - Fails to logon to vCenter VCSA using integrated authentication

I recently made a PowerCLI script to pull reports from 4 vCenters we got in our infra. Script was tested against once vCenter and was working great. So deployed it in out script host to be able to schedule and also configured to run it against all 4 vCenters. Then noticed it's getting stuck when it's at lab vCenter and pops up asking for credentials, which I was not expecting as it was suppose to run it using integrated authentication. Works fine against 3 remaining vCenters when I tried.

I was able to reproduce this issue by 

1) Opened PowerCli as service account that we are using to pull report.
2) tried to connect to Prod vCenter "Connect-viserver ProdvCenter" and it logged in immediately. 
3) "Connect-viserver LabvCenter" brought up credential popups again


4) To troubleshoot, I issued connect command again with verberos switch (-v) and cancelled the credential window. Below is the output from it.  

PS C:\Users\vCAdmin> Connect-VIServer -v VMwareLab
VERBOSE: Attempting to connect using SSPI
VERBOSE: Reversely resolved 'vmwarelab' to 'vmwaretest'
VERBOSE: SSPI Kerberos: Acquired credentials for user 'OurDomain\vCAdmin'
VERBOSE: SSPI Kerberos: InitializeSecurityContext failed for target 'host/VMwareLab'. Error code: 0x80090303
VERBOSE: Connect using SSPI was unsuccessful
Connect-VIServer : 2/08/2021 4:30:04 PM Connect-VIServer                Could not determine user name and/or password for server VMwareLab
At line:1 char:1
+ Connect-VIServer -v VMwareLab
+ ~~~~~~~~~~~~~~~~~~~~~~~~~~~~~
    + CategoryInfo          : NotSpecified: (:) [Connect-VIServer], ViServerConnectionException
    + FullyQualifiedErrorId : ViCore_Login_CredentialNotFound,VMware.VimAutomation.ViCore.Cmdlets.Commands.ConnectVIServer


After comparting the configs, I found the issue and line highlighted in red above is the key. 

1) ProdVC DNS entry is "ProdVCenter.OurDomain.com" and it's joined to AD with same hostname.
2) LabvCenter DNS entry is "vmwarelab.OurDomain.com" and this is what I am trying to connect. But VC is joined to AD with another name vmwaretest.OurDomain.com

Note -: you may need to login as administrator@vsphere.local to be able to view AD Domain section.


So I could just use vmwaretest.OurDomain.com in my script.

If at all you want to use the other name, you can still do that by creating a SPN to connect the host name with AD object. 
In my case I used below command to do this

setspn -A "HOST/vmwaretest.OurDomain.com" vmwarelab

which is 

setspn -A "HOST/<FQDN of vCenter as per Active Directory Domain config of VC>" <alternate name you want to use>

After this , just restart your vCenter which would also allow some time for AD replication,


Thanks!


Tuesday, January 5, 2021

vCenter 6.5 to 7.X upgrade - Stage 2 taking time at "Starting VMware Postgress"

 vCenter 6.5 to 7.X upgrade - Stage 2 taking time at "Starting VMware Postgress"


I was upgrading our PROD vCenter  6.5 to 7.x and because it's PROD, opted to copy Events + Perf Data and config, which was totaling around 75GB data be copied. 

I was taking a lot of time at step "Starting VMware Postgress" and I was worried as the step just says it's trying to start Postgress! After waiting for 30 mins, I checked messages and logs in the new appliance and it was all referring to Postgress. I was running short of time and decided to give-up and restart. 

Started the Stage 2 again and it was stuck again. This time I decided to give it little more time as I was to postpone the change if that doesn't work. To my surprise it moved on after 50 mins

I wish if VMware labled that step in the upgrade process giving more info! 

Best of luck! 

Monday, March 30, 2020

Remote Desktop Failed - "An internal error has occurred"


OS -: Windows 2012 R2 Standard

Recently came across a server that was throwing this error, "An internal error has occurred" ,when an RDP session was attempted.

I could get in to the server

1) First thing I did was to restart"Remote Desktop Services" service. Service was restarted, but no luck with RDP sessions yet.

 2) Checked was event logs for any errors during RDM restart
Bingo! there's one

"The RD Session Host Server has failed to create a new self signed certificate to be used for RD Session Host Server authentication on SSL connections. The relevant status code was Access is denied."

3) Lets check Certs
Start -> Run -> type MMC and Enter

in MMC
File -> Add/Remote Snap-ins
Select Certificates and
Select Computer account and next
Leave selection as Local Computer and Finish
Press OK to complete. 
Expand Certificates and under Remote Desktop there was self-signed cert and it was expired.

4) So I decided to issue a new cert and decided to go with Enterprise CA.

5) Submitted a new cert by going to

First Folder "Personal"
Right click -> All Tasks -> "Request a new certificate"
Complete this using your organization's cert template.

You can also generate a new self-signed cert and export it to Personal store. Please note it needs to be there for the next command to work,


6) Once you have the new cert (CA or Self-Signed) sitting in personal store, we need to copy it's Thumbprint.
For this double click and open the cert inside MMC
Go to details tab
Scroll all the way down and last item will be Thumbprint.
Click that and you can see the Thumbprint listed below. Select and copy the whole value to a notepad file.
After that remove the blank spaces between characters. Mine looks like below

3c7a7a78ac6699b79182dff11329834117a183b3


7) open a command prompt as administrator and run below command, by replacing the Thumbprint with your
wmic /namespace:\\root\CIMV2\TerminalServices PATH Win32_TSGeneralSetting Set SSLCertificateSHA1Hash="3c7a7a78ac6699b79182dff11329834117a183b3"

once successfully completed, it will look like this


Should be all good once you restart "Remote Desktop" service once again. 


=========================================================================

If that was not applicable (Cert is still valid) , then try below

Enable TLS 1.2 at the system (SCHANNEL) level:

Windows Registry Editor Version 5.00
[HKEY_LOCAL_MACHINE\SYSTEM\CurrentControlSet\Control\SecurityProviders\SCHANNEL\Protocols\TLS 1.2]
[HKEY_LOCAL_MACHINE\SYSTEM\CurrentControlSet\Control\SecurityProviders\SCHANNEL\Protocols\TLS 1.2\Client]
"DisabledByDefault"=dword:00000000
"Enabled"=dword:00000001
[HKEY_LOCAL_MACHINE\SYSTEM\CurrentControlSet\Control\SecurityProviders\SCHANNEL\Protocols\TLS 1.2\Server]
"DisabledByDefault"=dword:00000000
"Enabled"=dword:00000001


Friday, March 27, 2020

Horizon View - Get a report of the max concurrent connections / day

Project -: Horizon View - How to get a report of the max concurrent connections / day

Horizon View Version -: 7.10

As many of you know , Horizon View is missing a native reporting feature.

Those who are interested, you can try Horizon Toolbox Fling at the link below, which would give you some additional features

https://flings.vmware.com/horizon-toolbox-2

This includes a graph of max concurrent connections / day, which is very interesting.


It wasn't quiet what I was looking for as I needed numbers and it was hard to get it from the graph when you chose a higher time frame from the dropdown here.

When I used this fling, it was asking for credentials to connect to View Event DB. So what's positive is the data I am looking for is somewhere there in the MS SQL DB :)

Did a google search and ended up in the KB below

https://kb.vmware.com/s/article/2089816

I was really happy, but that didn't last for long. This KB is not applicable for View 7.X. I gave it a try anyway, but the SQL Query mentioned there didn't work.

After digging a lot we found the SQL Table and altered MS SQL Query. Below is the MS SQL Query ran against View_Events DB that worked for us and a screenshot of the how the output looks like


SELECT TOP 50 sum(vedh.IntValue) AS [Count], veh.Time as [Time] FROM VEevent_data_historical vedh JOIN VEevent_historical veh ON vedh.EventID = veh.EventID WHERE (vedh.Name = 'UserCount') GROUP BY veh.Time ORDER BY veh.Time DESC


Now that's what I wanted :).

This MS SQL Query will get you data which's like an End Of the Day report which Max. number of user connection / day. 

But we didn't stop there. We decided to display this data in an web page and I will explain how we did that in the part 2 of this blog post.
If you are happy running MS SQL query when ever you want this data, you may stop here :)

Part 2 - How to setup a Web Page to display this data 

Main reason for this was to make this data avilable for the management. 
I decided to use PHP as my choice of code, simply because my past experience in it and I could find a lot of examples out there in the web.

I decided to host this webpage in my Win10 VDI machine

Requirements
>> Required to install IIS on the box
>> Then we need to setup PHP on the box
>> Needs an ODBC connection to MS SQL Server hosting View_Event DB. We need a service account created in SQL for this.

Lets start... 

a) Install IIS 

1) Open Programs and Features from Control Panel 

2) Click on Turn Windows features On or off

3) Install IIS with defailt feature + select CGI as one additional option


b) Install PHP

1) Download latest PHP Windows from here

2) Extract the .zip file to a Directory of your choice. I decided to go with "D:\php"

3) You can find file "php.ini-development" under the above directory. Make a copy of it and name it as "php.ini"

4) Open "php.ini" file in a text editor and search for below entries (in bold) one by one. Once you find it, remove the ";" before the line to un-comment and update it's values as below (in Blue)

error_log = "php_errors.log"
open_basedir = "C:\inetpub\wwwroot"
extension_dir = "D:\php\ext" 
cgi.force_redirect = 0

cgi.fix_pathinfo = 0
fastcgi.impersonate = 1

and 

Search for "Dynamic Extensions" in the file and add below extentions there after last commented line, before the nex section which is "Module Settings" 

extension=php_pgsql.dll
extension=php_odbc.dll


c) Configure IIS with PHP

1) Go to Start -> Run and Type "inetmgr" and enter

2) On the right panel, Open "Handler Mappings" 

3) On the right most panel, under "Actions", click on "Add Module Mapping"

4) Create below mapping it to php-cgi.exe that's in our php folder


Request Path -: *.php
Module -: FastCgiModule from the drop down 
Exectable -: D:\PHP\php-cgi.exe
Name -: FastCGI

d) Create a SQL User and Assign Read Permission to SQL DB

Create a new SQL User and assign Read Permission to the user in your Horizon View MS SQL Server. 

UserName: reportsuer
Password: reportsuer


You may use AD authentication instead, or use a strong password. But then you need to update our php code which we will be create in Part 3 with the uname and password that you want to use. 

e) Setup an ODBS Connection

Now let's go back to out "WebServer", which in my case is the Win10 machine where I have installed PHP and IIS

1) Start and Search for ODBC


2) I'm selecting ODBC 64 bit based on my machine

3) Create a new System DSN

4) Select SQL Server and Click Finish

5) Name "VIEWODBC"
Again - if you wish to change, you need to update the connection strign in the PHP code below.

6) Your choice of Description

7) Server -: FQDN or IP of the MS SQL Server hosting View_Event DB

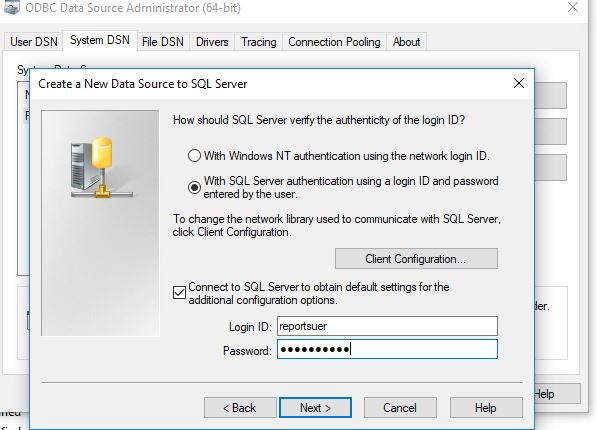
8) Next and careful at the next one. Because I created a SQL Server Authentication, I am choosing that and providing user reportsuer and password reportsuer 


9) Again in the next page, Check the box which says "Change Default Database to" and select View_Events

10) Leave the rest in default setting and it's always better to test the connection at the end before you close. 

Done with all configs required to run our small report Web page now :)

Part 3 - Test and then create our report web page

1) To test php

Open notepad and copy paste below lines to it

<html>
 <body>
  <h3>PHP Test Page</h3>
   <?php

                 echo "PHP Test Page <br />";

  ?>
 </body>
</html>

2) Save the file as Check.php

3) Copy the file in to C:\inetpub\wwwroot

4) Open a web browser and test the page by going to http://localhost/check.php

Works and we are almost there :) 

Now, 

2) To test ODBC connection
Open out Check.php and add below (in blue) lines to it


<html>
 <body>
  <h3>PHP Test Page</h3>
   <?php

                 echo "PHP Test Page <br />";

                 $db = odbc_connect("VIEWODBC", "reportsuer", "reportsuer");
                 print "ODBC connection established";
  ?>
 </body>
</html>


2) Now you may test again and if all good, you can see below page


3) Now the most exciting part, let's host out Report web page.

Open a new notepad and copy paste below code to it and save it as Report.php.
after that move it to C:\inetpub\wwwroot like we did before

<html>
<head>
 <title>View Session Report</title>
</head>
<body>
<table border="1">
<caption>Max Horizon View Connections per day</caption>
<tr>
  <th>Max Connections
  <th>Date
</tr>

 <?php
  $db = odbc_connect("VIEWODBC", "reportsuer", "reportsuer"); 
  $stmt = "SELECT TOP 30 sum(vedh.IntValue) AS [Count], veh.Time as [Time] FROM VEevent_data_historical vedh JOIN VEevent_historical veh ON vedh.EventID = veh.EventID WHERE (vedh.Name = 'UserCount' and vedh.IntValue > '0') GROUP BY veh.Time ORDER BY veh.Time DESC";
  $result = odbc_exec($db, $stmt);
  if ($result == FALSE) die ("could not execute statement $stmt<br />");
 
   while (odbc_fetch_row($result))
    {
             print "<tr>\n";
    print "  <td>" . odbc_result($result, "Count") . "\n";
             print "  <td>" . odbc_result($result, "Time") . "\n";
             print "</tr>\n";
    }
 
  odbc_free_result($result);
  odbc_close($db);
?>
</table>
 
</body>
</html


2) Once done, browse the page and test it :)


Above is the how the report page looks like! 
You may also try accessing it from outside the PC by using 

http://<hostname or ip>/Report.php


Update

If you look at the above report, there are two lines there which shows 0 connections. But if you look at the date, there's also a line below that with the same date and with correct number of sessions. 

So I updated the MS SQL Query as below to remove these 0 entries. 

SELECT TOP 30 sum(vedh.IntValue) AS [Count], veh.Time as [Time] FROM VEevent_data_historical vedh JOIN VEevent_historical veh ON vedh.EventID = veh.EventID WHERE (vedh.Name = 'UserCount' and vedh.IntValue > '0') GROUP BY veh.Time ORDER BY veh.Time DESC

Note -: Works for us because we have users everyday. In your case if there are days where 0 users login, this wont work and those days will be missing from the report. So be mind full when you update your Report.php with above MS SQL Query. 


Thursday, March 19, 2020

PowerCLI Script - Create a report of Virtual Machines and ESXi hosts in your infra

This needs PowerCli installed
https://code.vmware.com/web/tool/11.5.0/vmware-powercli


1) Download the script

https://github.com/msexpertzone/VMware-PowerCLI/tree/master/vSphereInfraReport

2) Copy it to a folder and create a "Report" folder in it.


3) Update your vCenter FQDNs in vCenterList.txt file. If there are more than one vCenter, add the second one in a new line
4) Open PowerShell as administrator
5) Run the script and wait for the inventory to complete.

> AllVMReport.ps1 = Will get you report of All VMs
> ESXIReport.ps1 = Fetched ESXi details

6) Report is saved individually in "Report" folder

Both scripts can run parallel.


Note Permissions

The account that's used to run the script needs Read Only permissions in vCenter.
Apart from that the user also needs CIM permission to read hardware details that's collected part of ESXIReport Script. 


Sunday, March 15, 2020

vSphere Infra - Disable TLSv1 and TLSv1.1

vSphere Infra - Disable TLSv1 and TLSv1.1

below are the methods used in vSphere 6.5 and 6.7

Disable TLSv1 and TLSv1.1 on vCenter Server Appliance

1) Scan to check current status


/usr/lib/vmware-TlsReconfigurator/VcTlsReconfigurator/reconfigureVc scan


Above scan result shows us there are TLSv1.0 and TLSv1.1 enabled. 

2) Now to enable only TLS1.2 use below command

Note-: This is not a live change. Proceeding this step will restart vCenter services. 


/usr/lib/vmware-TlsReconfigurator/EsxTlsReconfigurator/reconfigureVc update -p TLSv1.2
Once complete you can see


Disable TLSv1 and TLSv1.1 on ESXi servers

1) On VCSA appliance CD to ESXTLSReconfigu


cd /usr/lib/vmware-TlsReconfigurator/EsxTlsReconfigurator
You have three options.

a) Run it against ESXi host / ESXi hosts
b) Run it against vCenter Cluster / vCenter Clusters

To run it against a vCenter clustervCenter clustes 

./reconfigureEsx vCenterCluster -c Cluster_Name -u Administrative_vCenter_User -p TLSv1.2
Command support providing multiple cluster names in comma separated format. 

To run it against ESXi host / ESXi hosts

./reconfigureEsx vCenterHost -h ESXi_Host_Name -u Administrative_vCenter_User -p TLSv1.2
Command support providing multiple ESXi names / IP address in comma separated format. 


Also take a look at William's script here. There are two functions here, which makes it much easier and can also scan ESXi hosts, which is missing in reconfigureEsx natively.